Amazon SES Notifications Sent to HTTP/HTTPS Service Using SNS and Expressjs
My company recently switched from SparkPost to Amazon SES to provide our email sending services. I don’t want to go off on SparkPost, but there were too many missing features, safeguards, and their support let us down on a couple of occasions. The last straw was when their tracking server was down so any links our members clicked in the email would not resolve. That was it; I spent the day going from 0-60 using AWS SES.
What is SES missing vs. other Email Service Providers?
This article is technical, but I want to mention what SES is not compared to Mailgun, Mandrill, Sendgrid, etc.
Our company sends lots of transactional email like; email validations, welcome emails, new product emails, etc. We rarely need a MailChimp to manage our subscriptions since we handle members through our application and website. Because of this, any SMTP relay email service provider would work for us.
Here is what we wanted from the email providers out there:
- Rest or Nodejs API
- HTTP(S) notifications
- Open & click tracking
- Delivery, bounce, and complaint tracking
The above is what we use and are probably the core required features for 90% of companies using transactional email providers.
These points are all available from SparkPost. SES doesn’t have a click/open tracker, i.e., a proxy link that replaces your real links and captures clicks and opens by recipients. We found this useful in one-off situations but didn’t use the data for marketing or profiling our members.
So why did we move to SES?
1) Reliability. SparkPost was fine, but there were too many small problems, and we made the decision to try another service. I shouldn’t say SES will be the most reliable yet but I’ll assume it’s mature and part of AWS so it should be well supported.
2) Price. As a startup that prides itself on shoestring budgets, you can’t beat SES’s pricing. SES costs $0.0001($0.10 per 1000 emails), Amazon SES Pricing. SparkPost pricing is pretty good too compared to the field, but it’s still a lot higher than SES. We are sending about 250K emails a month, and our price hovers around $0.00022 per email or double the price. We have a single dedicated IP address at $20 which is $5 cheaper than SES, so that is the only exception on pricing.
TLDR; Jump here if you just want the technical stuff.
We will setup your SES email service to send Bounce, Delivery, & Complaint SNS notifications to your HTTP service using Expressjs & Nodejs to handle your user’s email. For example, if you get a notification, Bounce -> Permanent for a recipient then you will likely want to flag that user for no more mail.
I found the documentation for SNS & SES to be so massive, cross-linking, and redundant so I didn’t dig too much into it. I found a SO question answered by an AWS engineer; however, the answer was the same stuff I found in the first 30 minutes researching SNS notifications to an HTTP endpoint. I finished more confused than I started, so why not write this up to help others in the same spot.
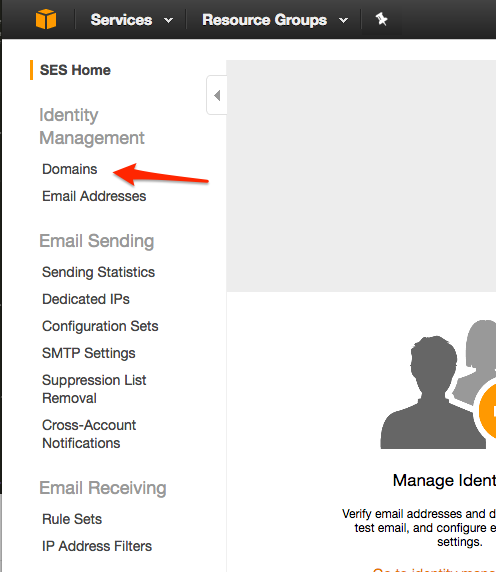
1) Create your domain in SES
Assuming you already have an AWS account, go to the SES Console
Create a new domain.
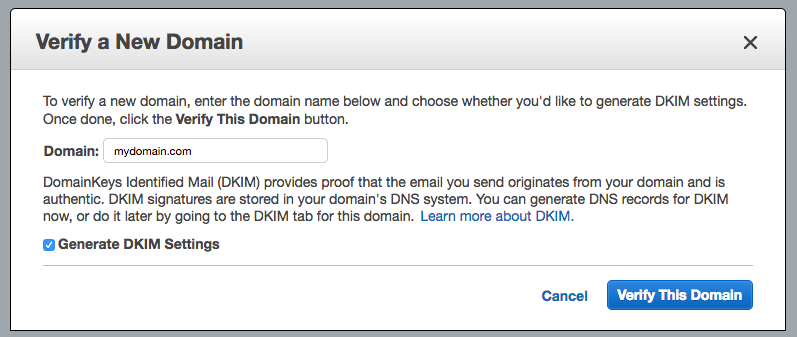
Create your domain for verification. Select Generate DKIM Settings which you will need to add as DNS entries.
Once you confirm the new domain you will be given these DNS entries you need to add to verify your sending domain.
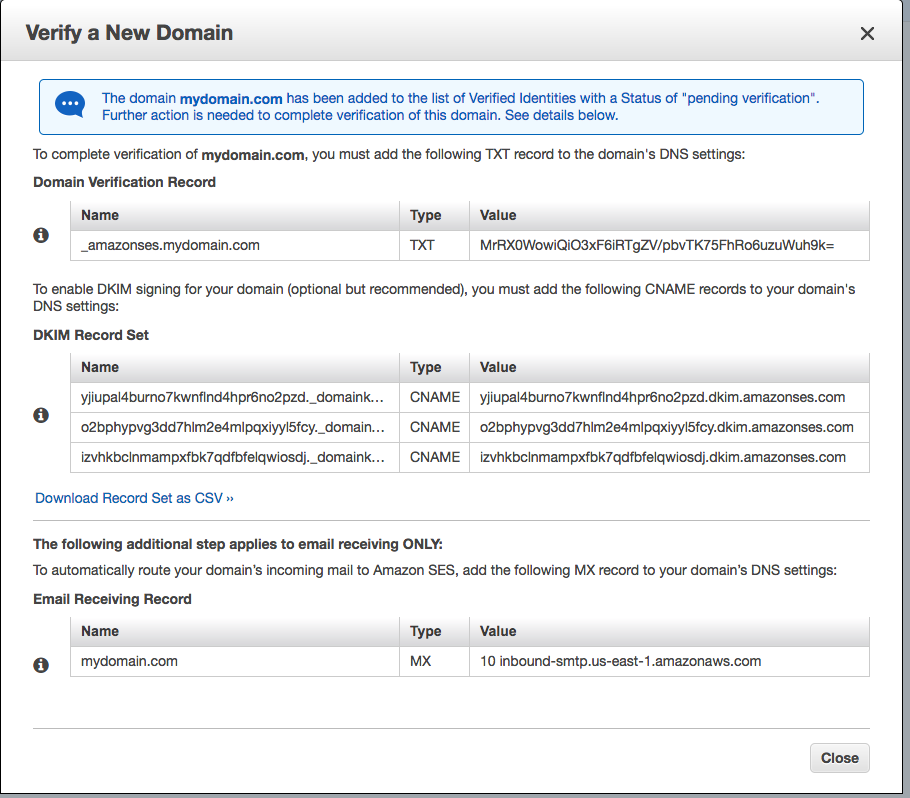
Once you add these DNS entries and AWS verified your domain, you will be given three SNS Topics; Bounces, Deliveries, & Complaints.
2) Configure SNS Subscriptions to send HTTP(S) notifications
By default, SES will send email notifications to the configured SES email and not HTTP notifications to a service. I never rolled out our SES service until all notifications came via HTTPS to our service. I’m sure I would have been bombarded with emails!
We’ll fix this and have a web service handle notifications instead. This post assumes you are running a Nodejs/Expressjs application and have some understanding of these.
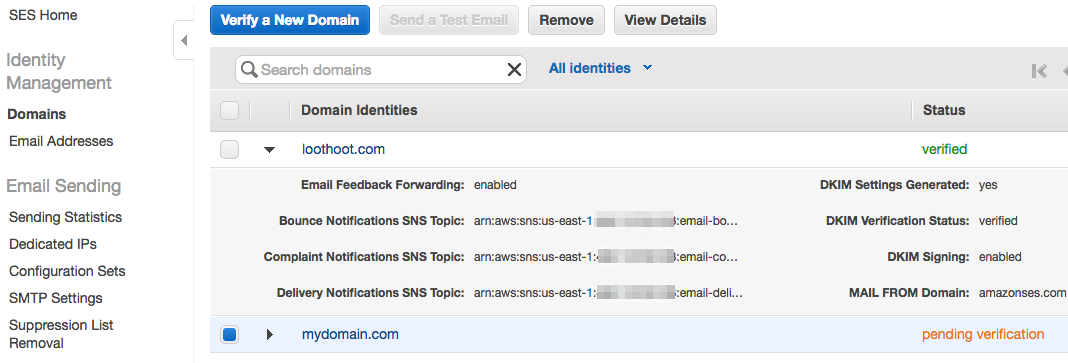
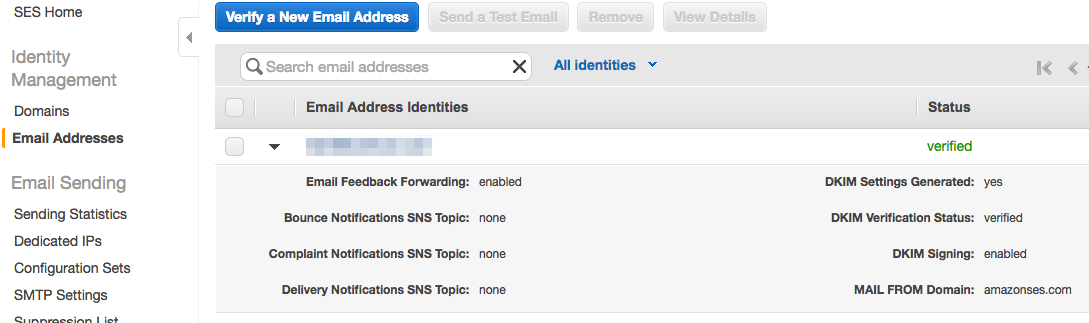
Before we setup SNS look at the image below, it shows a verified email address in SES. Note that the topics are none so no email notifications will be pushed to this email. Make sure you configure your emails to do the same.
Go to the SNS Console
Create three new topics, one for each of, bounces, deliveries, and complaints since these are the only three notifications sent by SES. Below shows mine but we will create one from scratch.
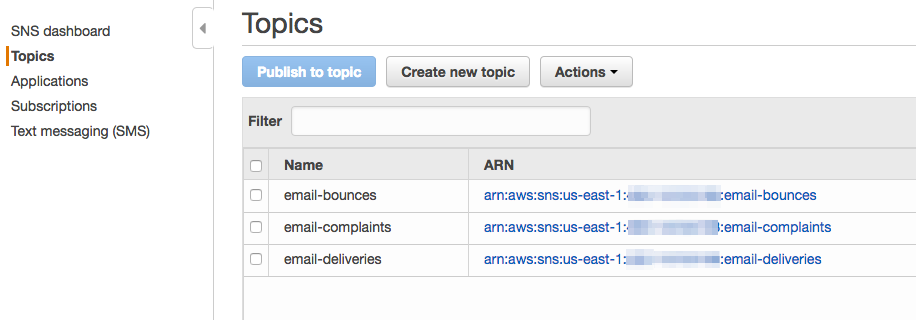
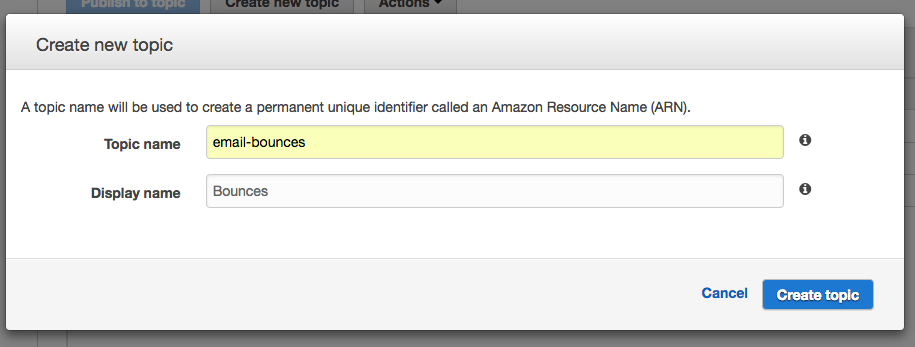
Create a new topic. Click Create new topic. Enter any Display name you want. For Topic name just enter the text after the last colon that shows under your verified domain in the SES console.
Don’t worry; they should be named; email-bounces, email-deliveries, and email-complaints. Once you click Create topic, the ARN should be filled in for you. Just make sure your topics ARN looks like mine in the previous image.
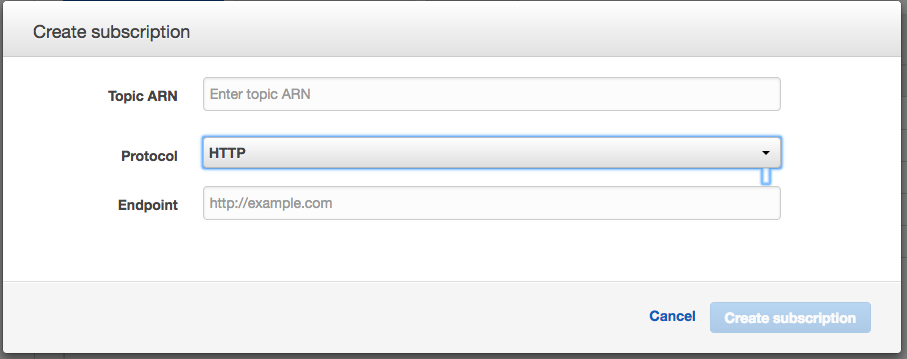
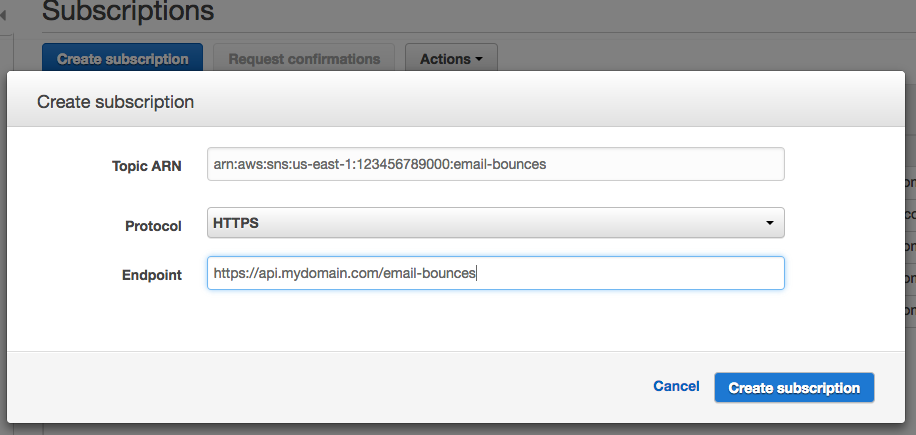
Once you create your topics, you need to create a Subscription for each topic. A subscription is how SNS sends out the notification. Subscriptions contain three parts; Topic ARN, Protocol, and Endpoint.
Your subscription topic will be the ARN to your bounce, delivery, or complaint topics. You will create three subscriptions.
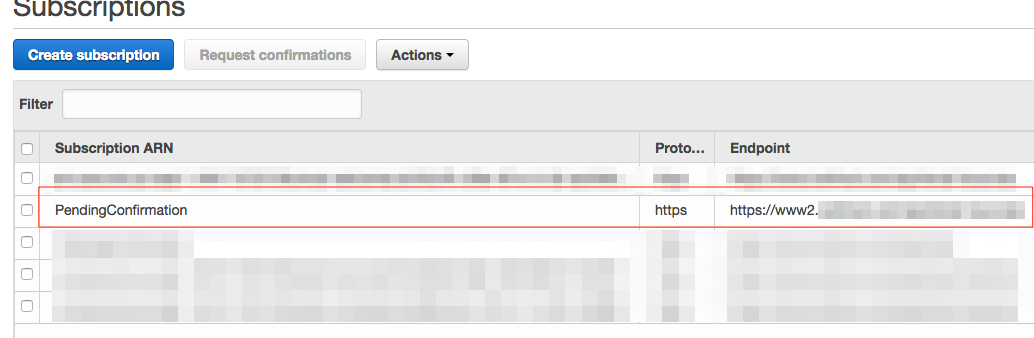
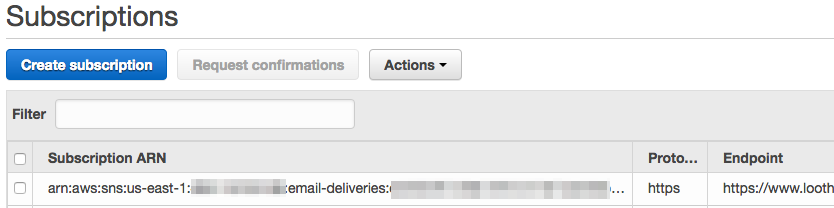
Below are my subscriptions, the PendingConfimation’s will be removed eventually if the request is not acknowledged. The others with an ARN in the Subscription ARN column are confirmed and receive notifications to their respective endpoints.

We’ll create one from scratch.
- The Topic ARN can be fetched from the “Topics” tab in this console or the SES console. It will look like arn:aws:sns:us-east-1:123456789000:email-bounces, this is clearly my bounces sent from my SES service in the US-East1 data center.
- Protocol, choose either HTTP or HTTPS if your running SSL.
- Endpoint, this will be your Expressjs route accepting the notifications for bounced emails.
As soon as you create the subscription, it will be PendingConfirmation, and will stay pending for three days. If you don’t acknowledge within this period, the subscription will be deleted automatically.
Now that the above is done, the rest gets a little gnarly.
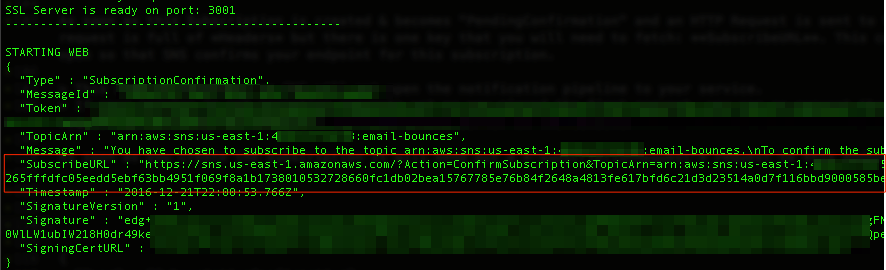
As soon as this Subscription is created & becomes “PendingConfirmation”, an HTTP Request is sent to the Endpoint you supplied. The request is full of Headers, but there is one key that you will need to fetch: SubscribeURL. This contains a link which you need to open so that SNS confirms your endpoint for this subscription.
This step is necessary, or SNS will not open the notification pipeline to your service.
3) Create your Expressjs service to handle SNS HTTP(S) Notifications, Part 1
Now that you created everything necessary on the AWS Console side, you will need a web service to handle the requests coming from SNS.
To make this happen your endpoint service can be as simple as the following:
// email.js
var express = require('express');
var app = express();

app.post('/email-notifications', function (req, res) {
	console.log(req.headers);
    res.status(200).json();
});

app.listen(3000, function () {
  console.log('http://localhost:3000 running...');
});
Run you app,
node email.js
Obviously, you will need to host this on the Internet, so the Endpoint is accessible by SNS. Also, make sure this route is added to the “Endpoint” when creating your SNS Subscriptions.
Here’s my console output from my Expressjs application showing the Request::Headers of the SubscriptionConfirmation request sent by SNS.
Just copy the SubscribeURL link and open it in a browser, that’s all you need to do to confirm this subscription.
If your service is not accepting requests yet or you missed the first request, you can re-request the “SubscriptionConfirmation” by clicking the Request confirmations button in the console.
To verify the subscription is confirmed after opening that link, go back to the SNS console and verify the subscription changed from PendingConfirmation to the ARN of the subscription.
Since the endpoint is the same as the verified domain, I would have hoped it would be confirmed automatically, but whatever this is not too bad.
4) Create your Expressjs service to handle SNS HTTP(S) Notifications, Part 2
The first part was just getting your service to dump the headers so you could confirm the subscription. This part is going to cover handling the incoming notifications in your service.
After the subscription is confirmed, you will start receiving incoming requests from SNS of the type Notification.
Here’s the example headers of the request you should expect:
{
	"x-amz-sns-message-type":"Notification",
	"x-amz-sns-message-id":"b99f70e1-2945-5047-93ac-20370e2cd1e2",
	"x-amz-sns-topic-arn":"arn:aws:sns:us-east-1:12345678909876:email-deliveries",
	"x-amz-sns-subscription-arn":"arn:aws:sns:us-east-1:12345678909876:email-deliveries:1cd52cf5-c58e-8a1e-b1d2-adc9db68ca99",
	"content-length":"1546",
	"content-type":"text/plain; charset=UTF-8",
	"host":"www.mysite.com",
	"connection":"Keep-Alive",
	"user-agent":"Amazon Simple Notification Service Agent",
	"accept-encoding":"gzip,deflate"
}
Notice that the message type is now “Notification” and not “SubscriptionConfirmation”. This is a good thing and shows that your pipeline is flowing with the email actions taken by your reciepients.
Note, this is just the headers outputted to the console like we did in the last part. We need to look at the posted content in the body of the request to see this notification. Normally you’d use the body-parser to parse the body of the request, and we will but notice the content-type is text/plain and we need to handle the body a bit differently.
Let’s go back to our app.js and allow the body-parser to parse the text properly or more specifically, to inflate the gzipped body. Since headers are not compressed, we can read them fine, but the body will not log to the console yet.
// email.js
var express = require('express');
var app = express();

// Needed to inflate gzipped bodies
var bodyParser = require('body-parser');
app.use(bodyParser.text());

app.post('/email-notifications', function (req, res) {
	console.log(req.headers);

	// Now we can view the body contents
	console.log(req.body);

    res.status(200).json();
});

app.listen(3000, function () {
  console.log('http://localhost:3000 running...');
});
Now, the incoming requests will log to the console, and we can read the contents in the body. Here’s an example,
{
	"Type" : "Notification",
	"MessageId" : "0c9f70e1-2945-5047-aa8f-20370e2cdb7b",
	"TopicArn" : "arn:aws:sns:us-east-1:12345678909876:email-deliveries",
	"Message" : "{\"notificationType\":\"Delivery\",\"mail\":{\"timestamp\":\"2016-12-22T19:10:31.693Z\",\"source\":\"You <noreply@mysite.com>\",\"sourceArn\":\"arn:aws:ses:us-east-1:12345678909876:identity/mysite.com\",\"sendingAccountId\":\"12345678909876\",\"messageId\":\"12345678909876-954d37de-9fec-4168-b536-968249e9f5a8-000000\",\"destination\":[\"Not 4 U 2 C <email@goes.here>\"]},\"delivery\":{\"timestamp\":\"2016-12-22T19:10:33.364Z\",\"processingTimeMillis\":1671,\"recipients\":[\"email@goes.here\"],\"smtpResponse\":\"250 ok dirdel\",\"remoteMtaIp\":\"111.125.69.99\",\"reportingMTA\":\"a8-237.smtp-out.amazonses.com\"}}",
	"Timestamp" : "2016-12-22T19:10:33.406Z",
	"SignatureVersion" : "1",
	"Signature" : "EH24negeSqLXUxLqBuUaRhyJvOCfE/Y2upa8qCCsQfT9o+MNnhBlW0csdxrasqI8SBIaAo9/kgPkITR2uNp2uVthhHjYCsXcrFnvOItMeB7sP3aTzjt7llq18k0vOv2wjW0uBfh7GpKNt6alBfo9r21fXdHCPvPRx9mwo45rgPWKoHIeu/4oyvUtD0+orLDjUGwowzPdqaFj8rjFcuW2voUdrb5hD2wNqfQIEe0gCgpHhjOilGdANpQvLkJQOu7qFz0FkL1YG9tamqLY6/hSqVvGCzYyy+OayjVUowCfA==",
	"SigningCertURL" : "https://sns.us-east-1.amazonaws.com/SimpleNotificationService-b95b3aafca.pem",
	"UnsubscribeURL" : "https://sns.us-east-1.amazonaws.com/?Action=Unsubscribe&SubscriptionArn=arn:aws:sns:us-east-1:12345678909876:email-deliveries:dc552cf5-c58e-4891e-1d2-adcdef4567"
}
We are now close! Notice that the Message property in the body is text (escaped quotes), we will want to parse it into JSON so it is usable within our application.
Actually, the whole body was text, but I performed JSON.parse(req.body) before outputting the console log above.
So let’s add the following into the route handler.
var json = JSON.parse(req.body);
var msg = JSON.parse(json.Message); /* Should have been done by the previous line but SNS escaped this property */
console.log(msg);
Here’s the console output of a “Delivery” notification.
"Message": {
    "notificationType":"Delivery",
    "mail": {
        "timestamp":"2016-12-23T00:08:06.576Z",
        "source":"You <noreply@mysite.com>",
        "sourceArn":"arn:aws:ses:us-east-1:12345678909876:identity/mysite.com",
        "sendingAccountId":"12345678909876",
        "messageId":"12345678909876-879a45b1-af2a-4de3-ba61-12345678909876-000000",
        "destination":["email@goes.here"]
   },
   "delivery": {
        "timestamp":"2016-12-23T00:08:07.722Z",
        "processingTimeMillis":1146,
        "recipients":["email@goes.here"],
        "smtpResponse":"250  <12345678909876-879a45b1-af2a-4de3-ba61-12345678909876-000000@email.amazonses.com> Queued mail for delivery",
        "remoteMtaIp":"123.213.132.23",
        "reportingMTA":"a8-237.smtp-out.amazonses.com"
   },
}
Here’s the console output of a “Bounce” notification.
"Message" : {
    "notificationType":"Bounce",
    "bounce": {
        "bounceType":"Transient",
        "bounceSubType":"General",
        "bouncedRecipients":[
            {
                "emailAddress":"Not 4U2C <email@qq.com>",
                "action":"failed",
                "status":"5.3.0",
                "diagnosticCode":"smtp; 550 Ip frequency limited. http://service.mail.qq.com/cgi-bin/help?subtype=1&&id=20022&&no=1000725\"}],
                "timestamp":"2016-12-22T19:10:34.662Z",
                "feedbackId":"12345678900987654-5d4843c6-3eed-48a2-8d29-12345678900987654-000000",
                "remoteMtaIp":"184.3.2.1",
                "reportingMTA":"dsn; a8-56.smtp-out.amazonses.com"
           }]
   },
   "mail": {
        "timestamp":"2016-12-22T19:10:28.000Z",
        "source":"You <noreply@mysite.com>",
        "sourceArn":"arn:aws:ses:us-east-1:12345678909876:identity/mysite.com",
        "sendingAccountId":"12345678909876",
        "messageId\":\"12345678909876-9716a9cb-5eef-411a-bff7-12345678909876-000000",
        "destination":["Not 4U2C <email@qq.com>"]
   }    }
So far I don’t have any complaints but instead of a “Delivery” or “Bounce” you’ll have a Complaint object
Final email.js
// email.js
var express = require('express');
var app = express();

// Needed to inflate gzipped bodies
var bodyParser = require('body-parser');
app.use(bodyParser.text());

app.post('/email-notifications', function (req, res) {
	console.log(req.headers);

	// Now we can view the body contents
	var json = JSON.parse(req.body);
	var msg = JSON.parse(json.Message); /* Should have been done by the previous line but SNS escaped this property */
	console.log(msg);

    res.status(200).json();
});

app.listen(3000, function () {
  console.log('http://localhost:3000 running...');
});
This is it. I hope it helps!